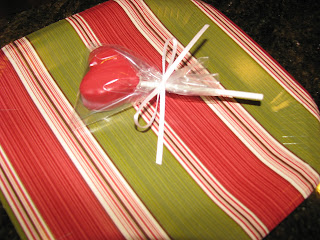
A Heart Cake Pop....
and, glow stick bracelets with a cute message!
We originally saw the idea of using a glow stick and message on Pinterest.
We just altered it a bit to make it easier and more of our own.
"You Make Me Glow" Valentines
Time to Complete: Approximately 20 minutes for 25 Valentines
Materials Needed:
- Markers (we used permanent)
- Hole punch
- Heart-shaped Foamies from Michael's - $2.99
- Glow sticks (we found glow bracelets in Target's Dollar Bins - 35 for $2.50) Plus, the bracelet size works GREAT!
Things I Would Do Differently:
- Place more paper under the Valentines if using permanent markers...oops!
- Let the message dry a little longer before having my child sign his name (a couple of them got a little smudged).
Glow in the Dark Bracelets
Choose your color and write your message on your hearts!
Then, punch two holes diagonally on the heart to
pull your bracelet through.
Next, bribe your child to sign his or her name 25 times!
(Carson received a bracelet upon completion:)
Carson thought he was pretty funny when he made
the "o"in his name around the existing hole punch.
Heart Cake Pops
Time to Complete: 1 1/2 hours
Materials Needed:
- Cake mix (I used Red Velvet)
- Can of Frosting (I used Cream Cheese)
- Heart-shaped cookie cutter
- Wilton's Melting Candies (choose any color you like!)
- Wilton's lollipop sticks
- Wilton's candy bags
- Ribbon
Servings: Greatly depends on size of cookie cutter, but we made around 40.
Step One: Bake cake following directions on box.
Step Two: Dump baked cake into bowl with frosting.
Step Three: Mix together.
These are the cookie cutters we used.
Step Four:
Press your cake mixture into your cookie cutter.
Step Five:
Gently remove cake from cookie cutter and lay on
a pan lined with waxed paper. Once your pan is full,
place in fridge for at least 10 minutes.
Step Six:
Open your bags of candies and separate into three
different bowls to melt in microwave. Be careful to follow
directions...it can burn!
Step Seven:
Dip your lollipop stick into melted candy.
Let excess drip off. Push into cake heart.
The melted candy will help it adhere to the cake.
Step Eight:
Once the candy on the stick is dry,
dip your hearts into the melted candy!
TIP: If your candy seems to be getting thick,
microwave it again and stir so that it doesn't
break your cakes during the dipping process.
Step Nine:
Lay out to dry (or put back in fridge).
Step Ten:
Once they are dried, place into candy bag and tie with ribbon!
So cute! We will also be adding name tags before handing them out!


Cool stuff, Sarah! You are much more creative than you give yourself credit for. We all are - we just have to find our canvass in life! Brenda I. (Auntie)
ReplyDelete